GSTR-3B is a monthly return. All regular taxpayers need to file this return till March 2019. You can file your return on GST Portal.
There are some inconveniences while filing from GST Portal:
There are some inconveniences while filing from GST Portal:
- Copy paste of values is not allowed.
- Chances of error are increased as manual entry of values has to be made.
- GST liability is calculated after submitting the return.
Latest Update!
CBIC has notified the due dates for GSTR-3B for the months of April, May and June 2019-
Here is the ClearTax Advantage if you file your GSTR-3B using ClearTax GST Software:
- Auto-filling of return on GST portal based on the sales and purchase details provided by you. This means no manual entries, no chances of error.
- Calculation of GST liability before submitting the return.
To know the step by step process of filing GSTR-3B check out this video.
Here is a step-by-step guide to filing GSTR-3B on GST Portal:
Step 1 – Login to GST Portal.
Step 2 – Go to ‘Services’ > ‘Returns’ > ‘Returns Dashboard’.

Step 3 – This displays the ‘File Returns’ page. Select the ‘Financial Year’ & ‘Return Filing Period’ for which you want to file the return from the drop-down list. Click the ‘SEARCH’ button.

Step 4 – On ‘Monthly Return GSTR-3B’ tile, click the ‘PREPARE ONLINE’ button.

Step 5 – Enter values in each tile. You need to enter totals under each head. Fill in Interest and Late Fees, if applicable.
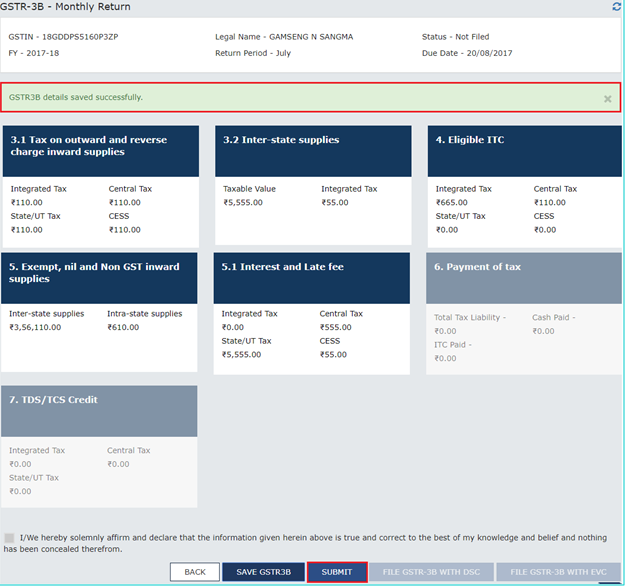
Step 6 – Click the ‘SAVE GSTR-3B’ button at the bottom of the page after all details are added. A success message is displayed on the top of the page.

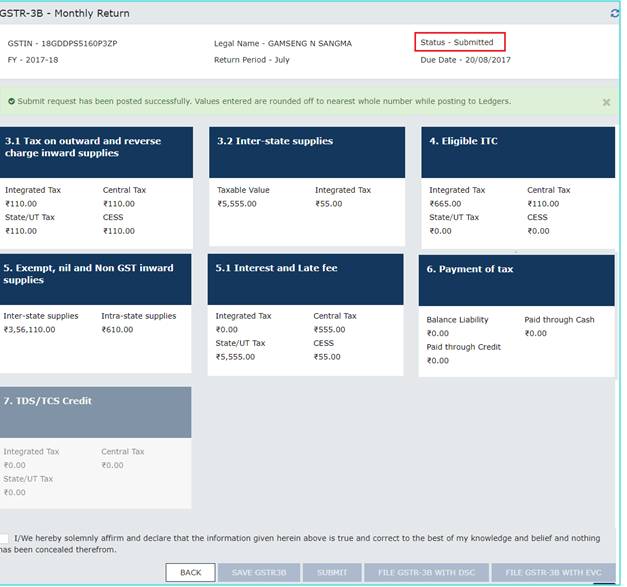
Step 7 – Once all the details are saved, ‘SUBMIT’ button at the bottom of the page is enabled. Click the ‘SUBMIT’ button to submit the finalized GSTR-3B return.
A success message is displayed at the top of the page. Once you submit the form, the added data is frozen. No changes in any fields can be made after this. The ITC and Liability ledger will also get updated on submission.
Status of the GSRT- 3B will be changed to ‘Submitted’.


Step 8 – Scroll down the page. You will see that the ‘Payment of Tax’ tile is enabled after successful submission of the return.
To pay the taxes and offset the liability, perform the following steps:
- Click the ‘Payment of Tax’ tile.
- Tax liabilities as declared in the return along with the credits, get updated in the ledgers, and are reflected in the ‘Tax payable’ column of the payment section. Credits get updated in the credit ledger and the updated balance is seen when hovering on the specific headings in the payment section.

- Click the ‘CHECK BALANCE’ button to view the balance of cash and credit. This functionality enables the taxpayers to check the balance before making the payment for the respective minor heads.

- Click the ‘OK’ button to go back to the previous page.

- Provide the amount of credit to be utilized from the available credit (in the separate heads) to pay off the liabilities.
- While providing the inputs please ensure the utilization principles for credit are adhered to, otherwise, the system will not allow for the offset of liability.
- Click the ‘OFFSET LIABILITY’ button to pay off the liabilities. A confirmation message is displayed. Click the ‘OK’ button.

Step 9 – Select the checkbox for declaration. From the ‘Authorised Signatory’ drop-down list, select the authorized signatory. Click the ‘FILE GSTR-3B WITH DSC’ or ‘FILE GSTR-3B WITH EVC’ button.

Step 10 – Click the ‘PROCEED’ button.

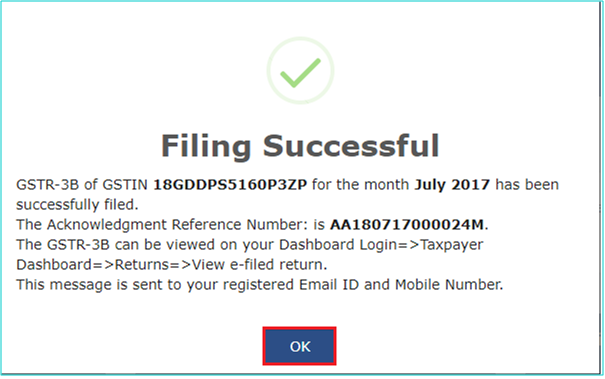
On successful filing, a message is displayed. Click the ‘OK’ button.

The status of GSTR-3B return will now have changed to ‘Filed’. You can click the ‘VIEW GSRT-3B’ button to view the GSRT-3B return.

For Further information and reading:
- GSTR-3B: Return Filing, Format, Eligibility & Rules
- Guide to file GSTR-3B on ClearTax GST Software
- Guide to file GSTR-3B using Tally
- Details to be mentioned in GSTR-3B
Any questions you will be aske.


0 Comments